NeurochainAI No-Code Workshop: Building a Finance AI Bot on Telegram (Day 2)

Introduction
This section focuses on automating the Finance AI Bot using N8N. The workflow will:
- Receive messages from users on Telegram
- Determine whether the message is a transaction, a balance inquiry, or another request
- Process financial transactions using NeurochainAI IaaS
- Store transaction data in Supabase
- Return structured AI-generated responses to users
The setup will be tested using Test Workflow Mode before final activation.
Step 1: Creating the Supabase Database Structure
Before building the automation in N8N, the database structure must be set up in Supabase.
1.1 Creating the Database Tables
- Go to Supabase and open your project.
- In the SQL Editor, create the database structure by running the provided SQL script:
SQL Commands - NeurochainAI Finance AI Bot
Once executed, the database will be ready to store user data and financial transactions.
Step 2: Adding Supabase Credentials to N8N
To connect N8N with Supabase, credentials must be added.
- Open N8N and go to Settings → Credentials
- Click "New Credential" and select Supabase
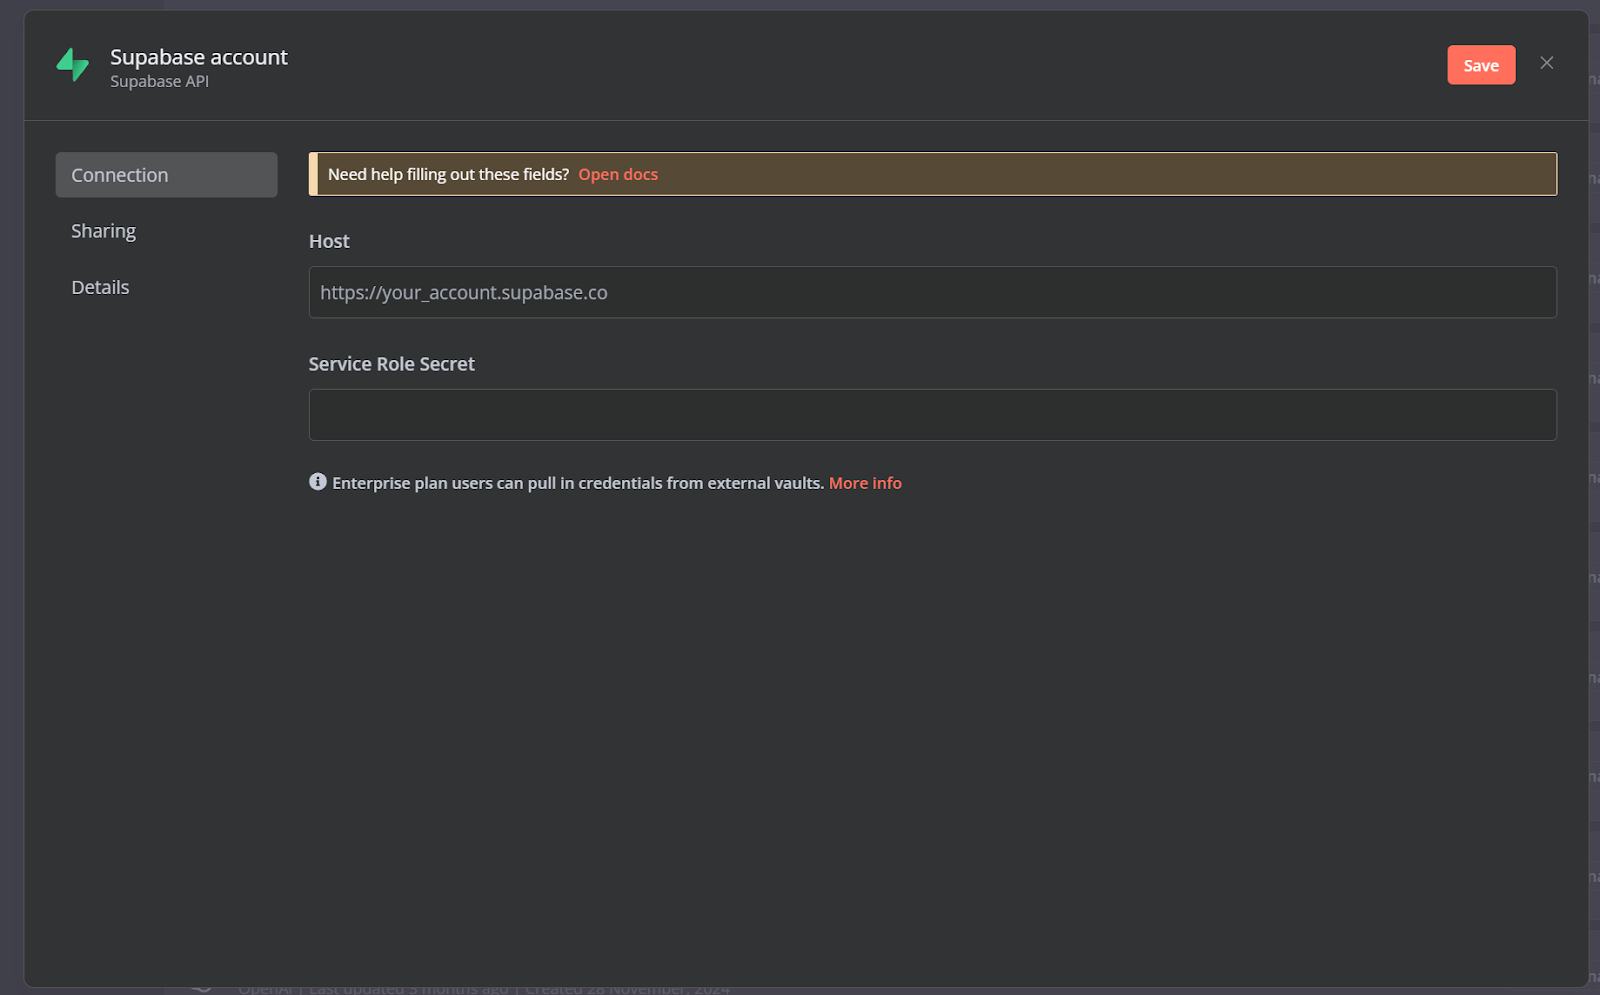
- Enter the following details from your Supabase project:
- API URL
- Anon Key
- Save the credentials.
Now, the bot can interact with Supabase for storing and retrieving financial data.
Step 3: Creating the Workflow in N8N
3.1 Open N8N and Start a New Workflow
- Open N8N Cloud (https://n8n.io/cloud) or your self-hosted instance
- Click "Create Workflow" and name it FinanceBot
- Keep the workflow in Inactive Mode to send test messages and verify behavior
Step 4: Setting Up the Telegram Trigger
The bot must listen for incoming messages.
- Click "+", search for "Telegram Trigger", and add it
- In "Updates", select "Message"
- Under "Credentials", select or create a Telegram API key (from Day 1)

Step 5: Checking If the User Exists in Supabase
To determine if a user is new or returning:
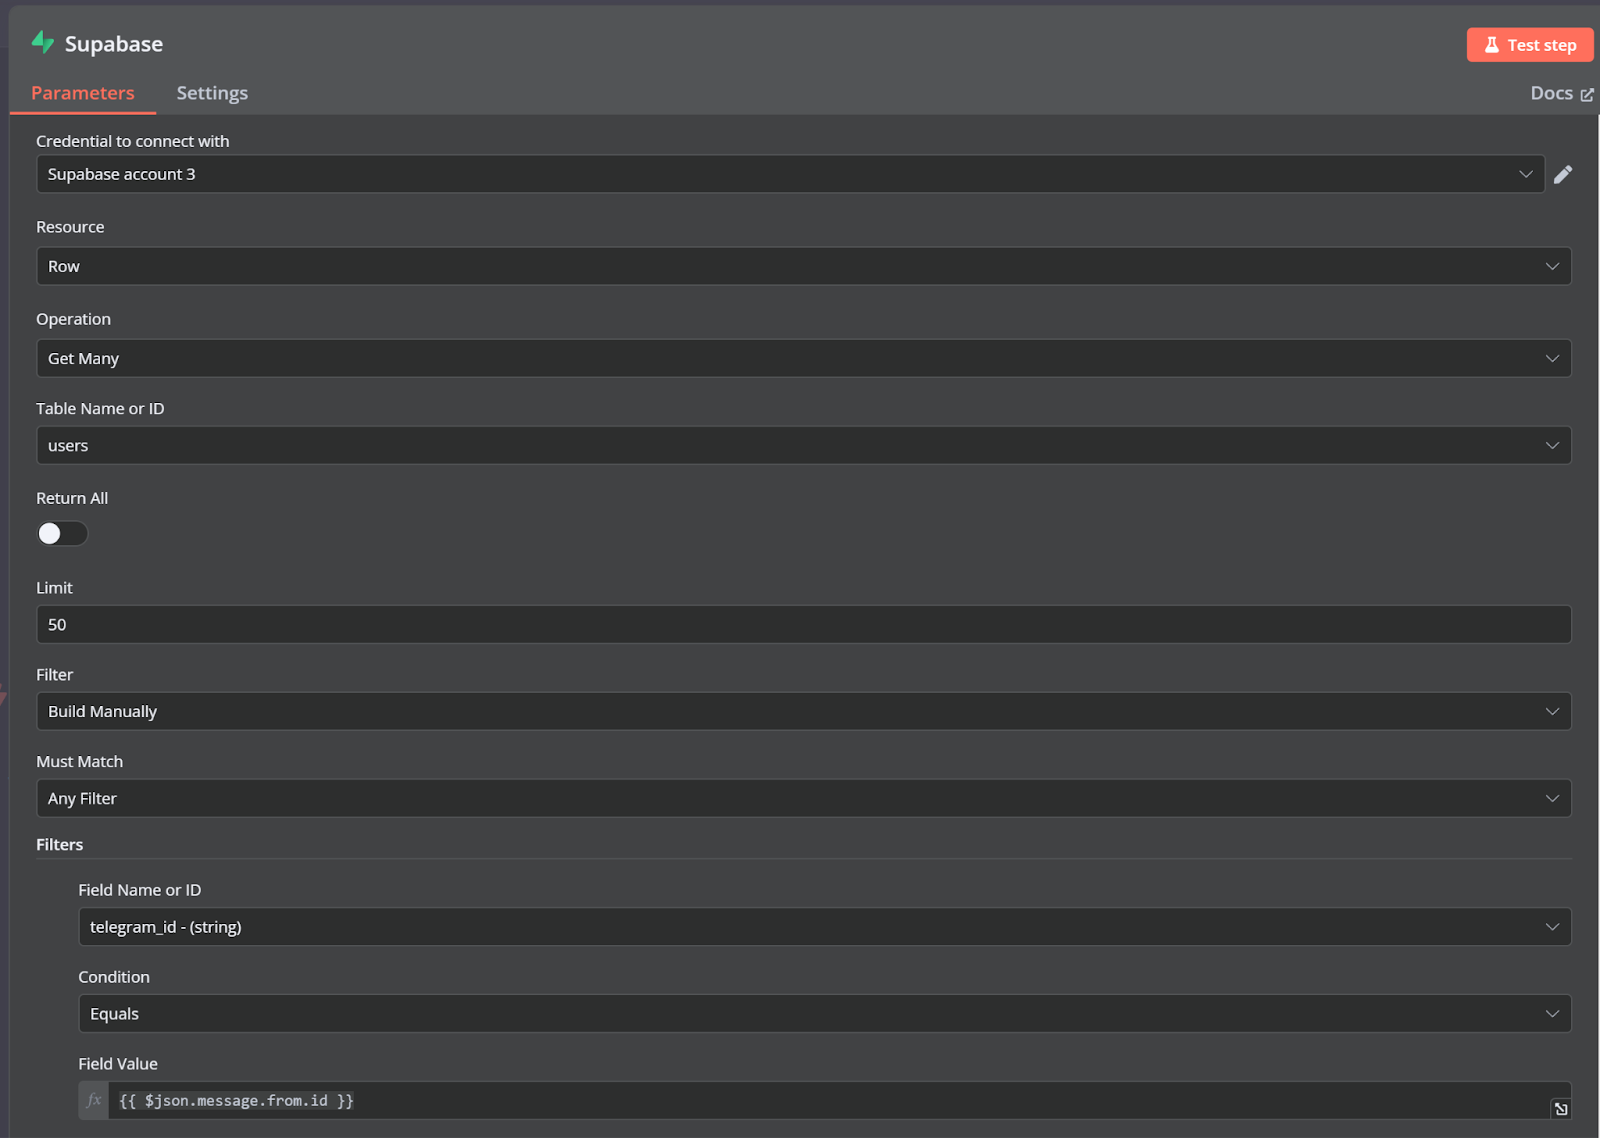
- Click "+", search for "Supabase", and add it.
- Set "Operation" to "Get All".
- Select "users" as the table.
- Add a filter:
- Key Name: telegram_id
- Condition: eq
- Key Value: ={{ $json.message.from.id }}
- Connect Telegram Trigger → Supabase.
Step 6: Registering a New User and Sending a Welcome Message
If a user is new, they must be registered and receive a welcome message.
6.1 Adding a Switch Node
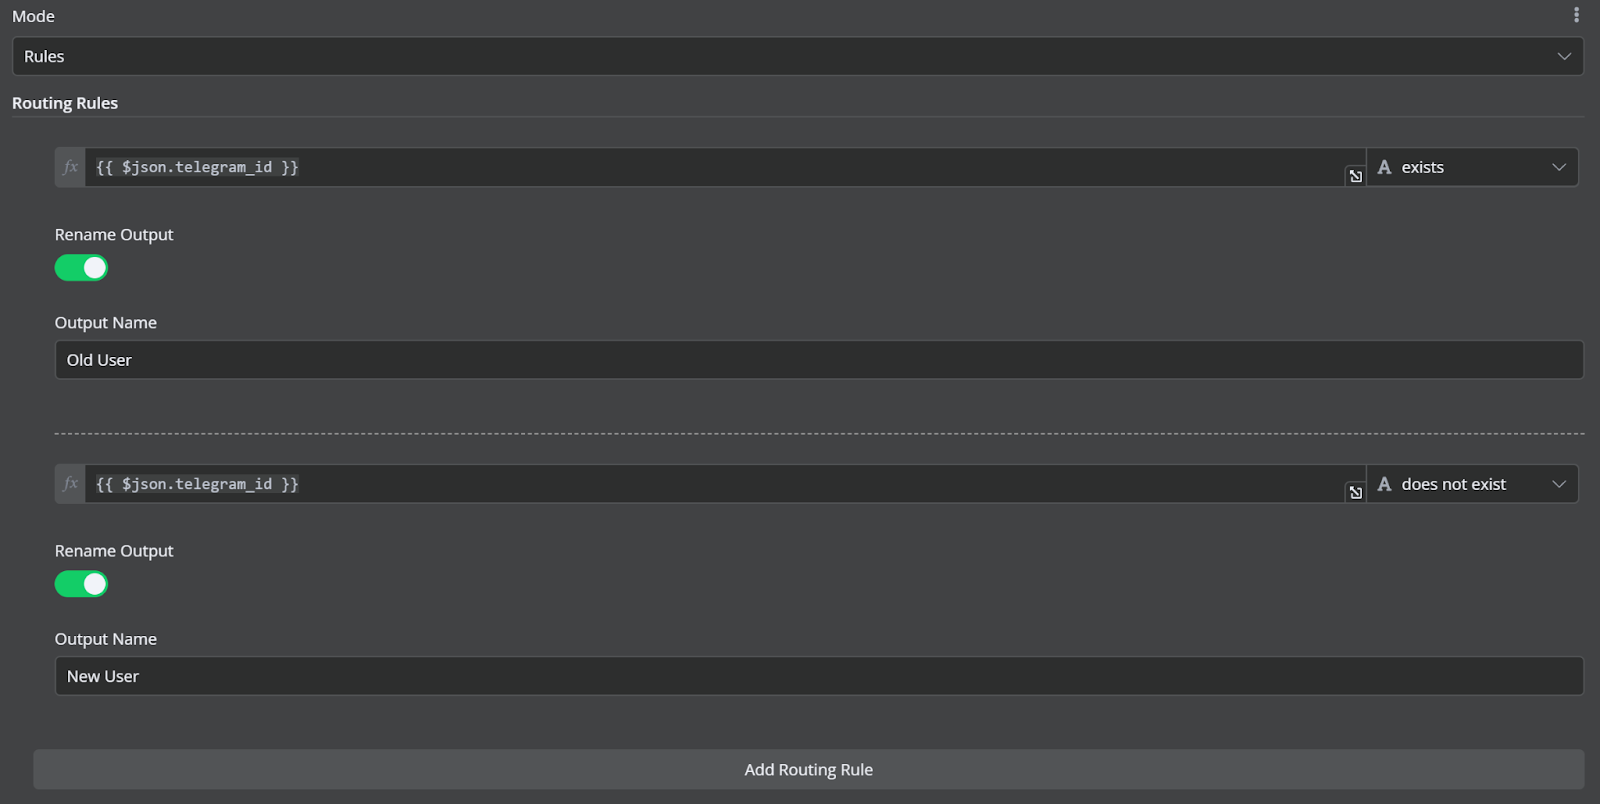
- Click "+", search for "Switch", and add it.
- Define conditions:
- Existing User: Check if telegram_id exists.
- New User: Check if telegram_id does not exist.
- Connect Supabase → Switch.
6.2 Storing the New User in Supabase
- Click "+", search for "Supabase", and add it.
- Set "Operation" to "Insert".
- Select "users" as the table.
- Add fields:
- telegram_id: ={{ $json.message.from.id }}
- name: ={{ $json.message.from.username }}
- Connect Switch (New User) → Supabase Insert.
6.3 Sending a Welcome Message
- Click "+", search for "Telegram", and add it.
- Resource: Message
- Operation: Send Message
- Chat ID: {{ $('Telegram Trigger').item.json.message.chat.id }}
- Text:
- "Welcome to FinanceBot! I can track your expenses and provide financial insights. Just tell me what you spent, and I’ll handle the rest."
- Additional Fields:
- Disable "Append Attribution to N8N".
- Enable "Parse Mode: Markdown (Legacy)".
Connect Supabase Insert → Welcome Message.
Step 7: Handling Commands and Messages
The bot will now process user messages.
7.1 Add a Switch Node for Message Types
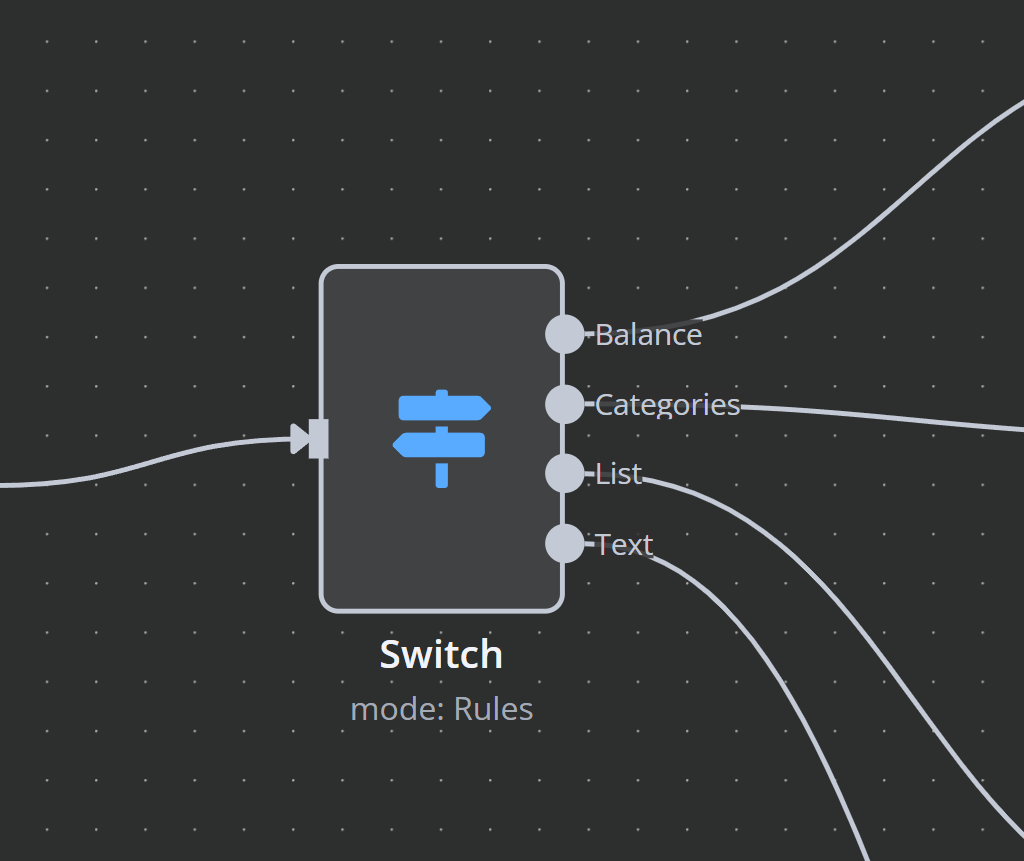
- Click "+", search for "Switch", and add it.
- Define conditions:
- /balance → Retrieve balance
- /categories → Show spending breakdown
- /list → Show last 5 transactions
- Other Messages → Process transactions & AI responses
- Connect this node only to the "Existing User" path from the previous Switch.
Step 8: Retrieving and Sending Financial Data
For /balance, /categories, and /list, Supabase provides the required data.
8.1 Setting Up Supabase Queries
For each command:
- Add a Supabase Node with "Get All" operation.
- Select the correct table:
- /balance → "user_financial_summary"
- /categories → "user_financial_summary"
- /list → "transactions"
- Filter by telegram_id.
8.2 Sending Telegram Responses
For each command:
- Add a Telegram Node:
- Resource: Message
- Operation: Send Message
- Chat ID: {{ $('Telegram Trigger').item.json.message.chat.id }}
- Message Content:
- /balance:
- "Your current balance is ${{ $json.balance }}."
- /categories:
- "Your spending breakdown: Food - ${{ $json.spent_food }}, Transport - ${{ $json.spent_transport }}."
- /list:
- "Your last 5 transactions: {{ $json.recent_transactions }}."
- /balance:
- Additional Fields:
- Disable "Append Attribution to N8N".
- Enable "Parse Mode: Markdown (Legacy)".
Step 9: Processing Transactions and AI Responses
NeurochainAI will analyze transactions and generate responses.
9.1 Setting Up the HTTP Request
- Add an HTTP Request Node:
- Method: POST
- URL: https://ncmb.neurochain.io/tasks/message
- Headers:
- Authorization: Bearer <API_KEY>
- Content-Type: application/json
- Body Type: JSON
Prompt Optimization:
The prompt is pre-configured in the template to ensure accurate classification of transactions and financial insights.
Final Step: Testing and Activating the Workflow
- Use Test Workflow Mode to validate results.
- If everything works, enable Active Workflow
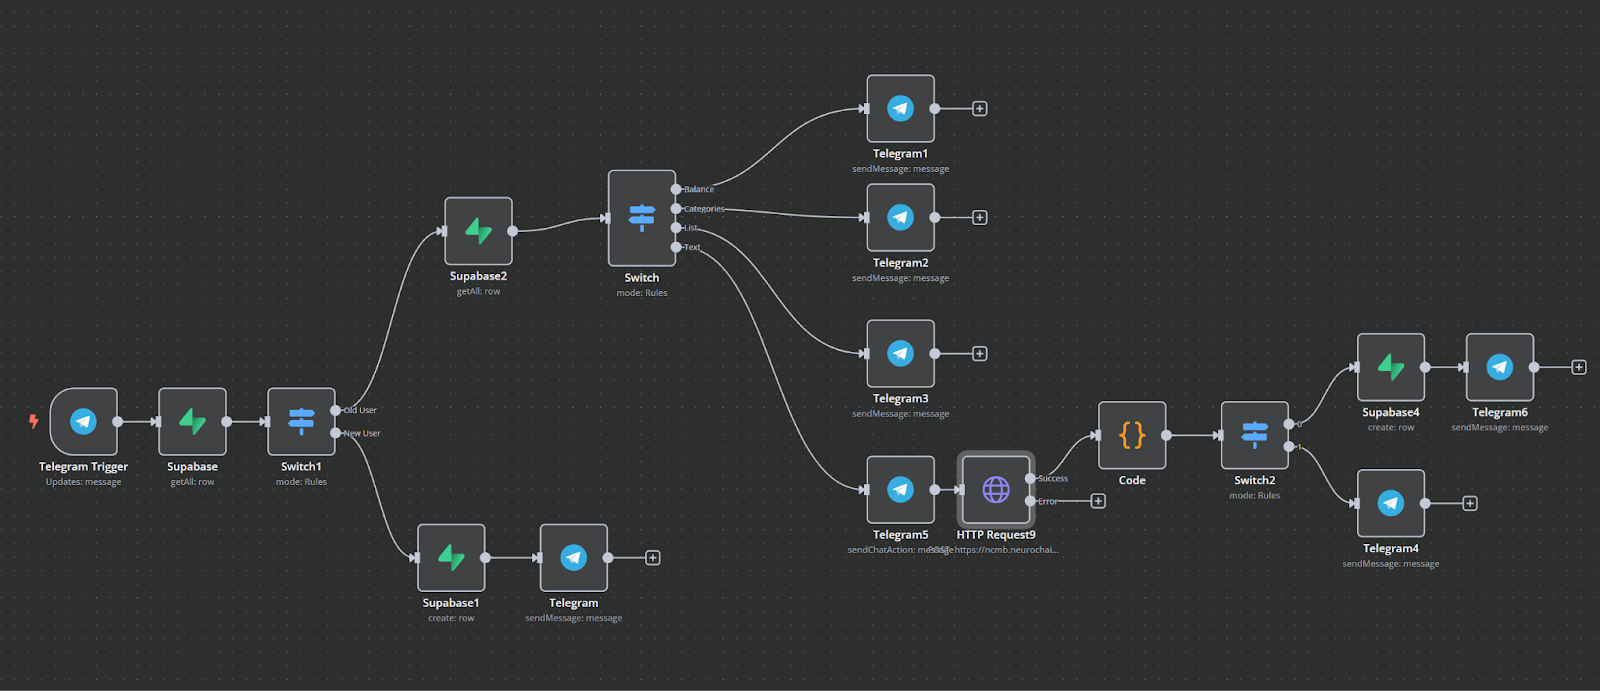
At this stage, the Finance AI Bot is fully functional. The workflow in N8N now:
- Receives and processes user messages via Telegram.
- Classifies messages as transactions, balance inquiries, or other financial insights.
- Communicates with NeurochainAI IaaS to process transactions and generate structured responses.
- Stores financial data in Supabase for accurate tracking and future analysis.
- Sends responses back to the user with relevant financial insights.
To accelerate the setup process, the complete FinanceBot template is available for import into N8N:
👉 Download the FinanceBot Workflow Template


