


Open API Protocol Integration: Step by Step Guide
Today, all startups and digital platforms want to have a piece of Artificial Intelligence (AI) in their solutions. Whether you're starting from scratch or adding AI to your existing digital solutions, the goal is always the same: optimize efficiency, and increase revenues at an optimal cost.
Let’s be honest, with the launch of ChatGPT OpenAI has revolutionized all digital products by offering an easy way to implement AI in customer service, content creation, and data analytics to name a few. However, the rapid expansion of AI comes with a hefty price tag primarily stemming from the hardware infrastructure cost required to compute AI responses (inference). Many businesses are facing costs that run into the hundreds of thousands of dollars to integrate and maintain AI-powered services.
But who can afford that? For small to medium-sized enterprises or developers just starting off, these expenses can be too high, limiting their ability to leverage cutting-edge AI solutions effectively.
NeurochainAI’s Solution: Save Big Time
As of now, NeurochainAI’s AI Inference DePIN (decentralized physical infrastructure network) is fully compatible with the Open API protocol. This means that businesses and developers using OpenAI for building their services can now seamlessly leverage the inference of the most popular open-source LLMs like Mistral and Llama on our DePIN at a fraction of the cost and without any need to upgrade integration protocols. With the Open API communication protocol there’s no need for an additional integration layer - everything functions smoothly and effortlessly.
Why would you care? The simple answer is cost. Right now, an inference instance on NeurochainAI costs 0.15 NCN regardless of the context length, output length or GPUs required to process the message. That’s at least x200 savings compared to traditional cloud compute providers.
On top of it, we’ve already quantized the most popular open-source AI models so you can save time and resources on preparing the models.
Key Features for AI Users and Companies
Us adapting Open API protocol brings a range of benefits:
- Seamless Integration for Developers: We've ensured that Open API protocol integration works flawlessly with all Web2 tools compatible with ChatGPT. Whether you're building from scratch or enhancing an existing platform, integration is now smoother than ever.
- Reduction in costs: Our solution offers a far more affordable alternative than cloud compute providers or owning your own hardware.
- Faster Adoption of Your Platform: By simplifying the integration process, we're helping you bring your AI-powered solutions to market more quickly. This means you can focus on what matters most - creating value for your users.
- Compute Availability: With our decentralized network of consumer-grade hardware that is always on everywhere, you gain immediate access to a vast ecosystem of AI compute, making it easier to leverage the power of AI in your applications.
- Enhanced Security: We provide message encryption to safeguard your data.
MindMac and NeurochainAI AI Network Integration Guide👇
Getting started is simple. Follow these steps to test the integration on MindMac:
Step 1: Accessing the MindMac Interface
1. Open the MindMac application on your system.
2. On the main dashboard, click the "Settings" icon located in the top-right corner. This icon usually looks like a gear.
Step 2: Preparing the NeurochainAI AI Network
- Ensure that the NeurochainAI network is accessible and that you have the necessary API key.
- Generate a new API key here.
Step 3: Configuring the Integration in MindMac
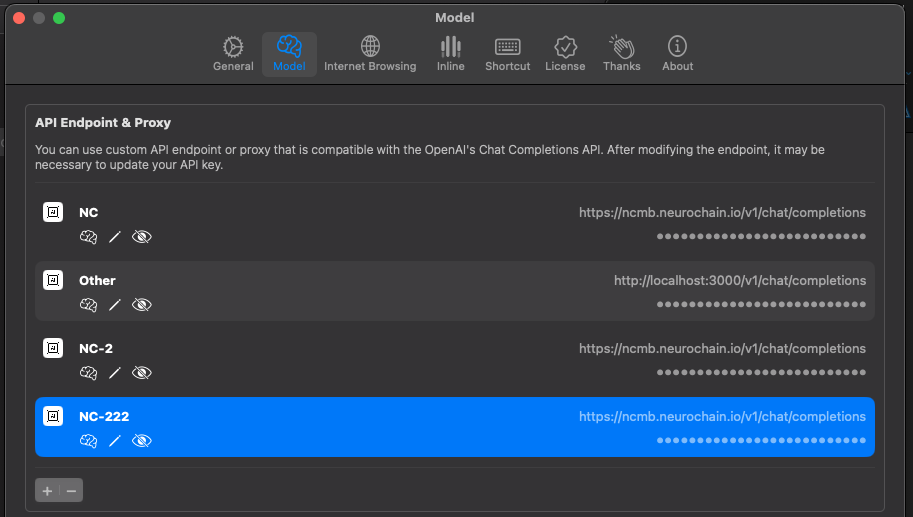
1. In the settings menu, click on the "Model" tab on the top sidebar.
2. Within the “API Endpoint & Proxy“ section, find and click the "Add Network" button. This might be represented by a plus sign (+) or labeled explicitly.
Step 4: Entering Connection Details
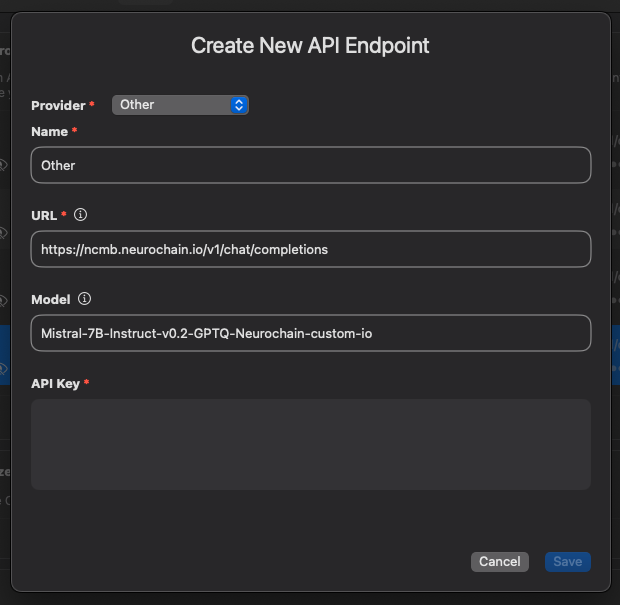
1. A form or dialogue box will appear. Here, select "Other" from the list of available providers.
2. Input the required connection details, such as the NeurochainAI AI network’s address (https://ncmb.neurochain.io/v1/chat/completions) and API key, into the respective fields.
You can use model “Mistral-7B-Instruct-v0.2-GPTQ-Neurochain-custom-io” for the first connection.
3. Double-check that all the information is correct, then click the "Save" button to proceed.
Step 5: Adding AI Models
1. After successfully connecting to the NeurochainAI AI network, click the "Models" button. This icon might look like a neural network or a brain symbol.
2. Click the plus button, which should be visible within this section.
3. Add all needed models, which are currently running on the NeurochainAI network (for example - Mistral-7B-Instruct-v0.2-GPTQ-Neurochain-custom-io).
4. If prompted, configure the models according to your requirements, then click "Save”.

Step 6: Testing the Connection and Models
1. Once the models are added, start a new conversation.
2. Select the NeurochainAI connection and pick the model.

To further assist you, we’ve also prepared a short video guide on how to integrate with MindMac for testing. This tutorial will walk you through the process, ensuring you can start leveraging our new features without any hassle.
Explore the possibilities today and take your AI integrations to the next level!
If you have any questions or concerns 👇
☑️ Send us an email at hello@neurochain.ai.
☑️ Create a ticket on Discord.
☑️ Post a question on Telegram.